how to inspect a used car: complete technical checklist
Buying a pre-owned vehicle without a thorough inspection is like gambling with your hard-earned money. Whether you’re examining a dealership offering or a private sale, knowing what to look for mechanically can save you thousands in future repairs. This technical checklist covers everything from engine health to brake systems, helping you make an informed decision as part of your essential used car buying guide for smart shoppers.I’ve personally walked away from dozens of seemingly perfect cars after spending 30 minutes with a flashlight and a keen eye. The sellers always look surprised when you catch things they hoped you’d miss. That’s the power of knowing what to inspect.
start with the exterior walk-around
Before you even pop the hood, circle the vehicle slowly and look at the body panels from different angles. Mismatched paint or slight color variations often indicate previous accident repairs. Run your hand along the edges of doors and fenders to feel for texture differences that spray paint leaves behind.
Check the gaps between panels. They should be consistent all around the vehicle. Uneven spacing suggests the car has been in a collision and poorly repaired. I once found a Honda Accord with perfect gaps on the driver’s side but gaps wide enough to fit my finger on the passenger side. The seller insisted it was never wrecked until I pointed this out.
Look at the tires carefully. Uneven wear patterns tell you about alignment issues or suspension problems. If the inner edges are more worn than the outer edges, the alignment is off and you’re looking at additional costs. Also check that all four tires match in brand and tread depth. Mismatched tires suggest the owner cut corners on maintenance.
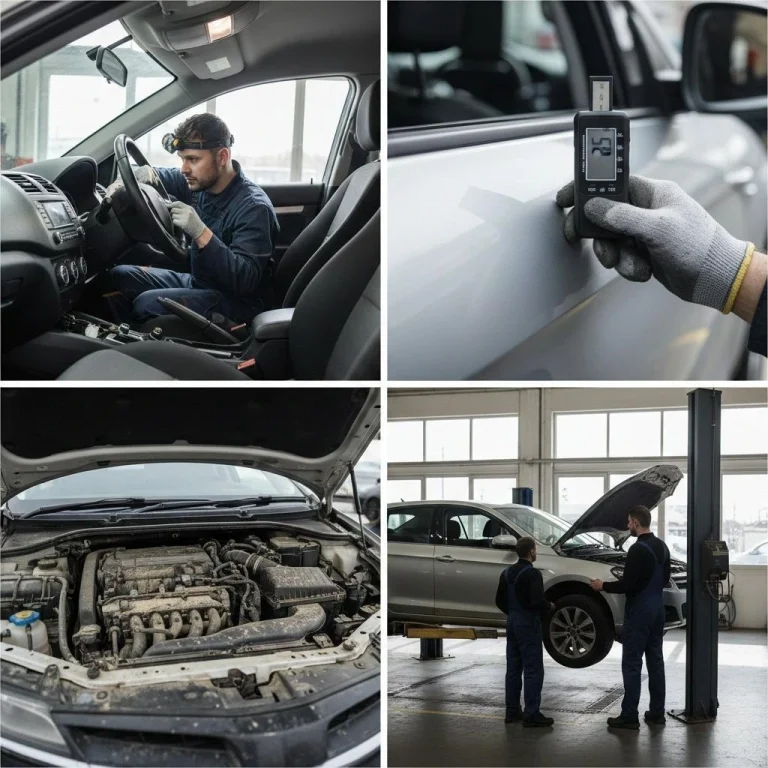
under the hood inspection
Pop the hood and let the engine cool if it’s warm. Sellers sometimes warm up problematic engines to hide issues. Look for oil leaks around the valve cover gasket and oil pan. A little grime is normal on older vehicles but fresh oil pooling anywhere is a red flag.
Pull the oil dipstick and examine the oil color. It should be amber or light brown. Black oil isn’t necessarily bad on higher-mileage vehicles but milky or frothy oil indicates a blown head gasket or coolant mixing with oil. That’s an expensive repair you want to avoid.
Check all fluid levels including brake fluid, power steering fluid, and coolant. Low levels suggest either leaks or poor maintenance. Open the coolant reservoir cap when the engine is cold and look inside. Rust or brown sludge means the cooling system hasn’t been maintained properly.
Look at the battery terminals for corrosion. Heavy white or blue-green buildup suggests an old battery that might need replacement soon. Check the battery manufacture date if you can find it stamped on the case.
Inspect all belts and hoses for cracks or fraying. A serpentine belt costs maybe 30 dollars but if it snaps while driving it can cause major engine damage. Squeeze the radiator hoses. They should feel firm but pliable, not rock hard or mushy.
interior and electrical systems
Slide into the driver’s seat and check that all adjustments work smoothly. Test the power windows, locks, and mirrors. These electrical components fail frequently and repairs add up quickly. I’ve seen power window motors cost 300 dollars to replace at shops.
Turn the key to the accessory position without starting the engine. Watch the dashboard for warning lights. The check engine light, ABS light, and airbag light should illuminate briefly then turn off when you start the car. If any stay on or don’t appear at all, something’s wrong or someone disconnected them intentionally.
Test the air conditioning and heating. AC repairs can easily run 500 to 1000 dollars depending on what’s failed. Make sure air flows from all vents and switches between defrost, face, and feet settings properly.
Check the odometer reading and compare it to the vehicle history report. If the numbers don’t match or the dashboard shows signs of tampering, walk away immediately. Odometer fraud is illegal but still happens.
Look under the floor mats and inspect the carpet for water stains or musty odors. Water damage causes endless electrical problems and mold growth. Check the trunk too, lifting the spare tire to inspect the spare tire well for rust or water accumulation.
The critical test drive
Start the engine when it’s cold if possible. It should turn over quickly without excessive cranking. Listen for any knocking, ticking, or grinding noises. A slight ticking from the valves is normal on some engines but loud knocking suggests serious internal damage.
Let the car idle for a few minutes. The idle should be steady without surging or stumbling. Watch the temperature gauge to ensure the engine warms up normally and doesn’t overheat.
During the test drive, accelerate firmly to feel for transmission slipping or hesitation. An automatic transmission should shift smoothly without clunking or delayed engagement. Manual transmissions should shift easily without grinding.
Test the brakes in a safe area. They should feel firm and stop the car in a straight line without pulling to either side. Pulsating or vibrating brake pedals indicate warped rotors. Squealing might just be cheap brake pads but grinding means metal-on-metal contact and immediate replacement needed.
Drive over some bumps at moderate speed. Excessive bouncing or clunking noises point to worn suspension components like struts or control arm bushings. Turn the steering wheel fully in both directions while parked. Grinding or clicking sounds indicate CV joint problems on front-wheel-drive vehicles.
Get the car up to highway speed if possible. It should track straight without constant steering corrections. Vibrations at certain speeds often mean wheels need balancing or tires have issues.
underbody and exhaust inspection
If you can safely get under the car or use a mechanic’s lift, inspect the undercarriage for rust, especially on the frame rails and subframe. Surface rust is normal in snow belt states but structural rust that flakes away when you touch it means the car won’t pass inspection in many areas.
Look at the exhaust system from the engine to the tailpipe. Holes, heavy rust, or temporary repairs with clamps and tape mean you’ll need a new exhaust soon. That can cost several hundred dollars depending on the vehicle.
Check for fluid leaks by looking at where the car was parked. Fresh drips of any color indicate active leaks that need diagnosis.
when to walk away
Some issues are negotiable while others should make you leave immediately. Walk away if you find evidence of major accident damage, frame damage, flood damage, or odometer tampering. Also avoid cars with severe rust, blown head gaskets, or transmission problems unless you’re getting an extreme discount and plan to fix everything yourself.
Minor issues like worn brake pads, old tires, or a dead battery give you negotiating leverage but shouldn’t necessarily kill the deal. Factor repair costs into your offer price.
Final recommendation
Never skip the professional pre-purchase inspection. For 100 to 200 dollars, a mechanic will catch problems you might miss and provide leverage for negotiation. I always tell people to budget for this inspection as part of their purchase costs.
If the seller refuses to let you take the car to a mechanic, that’s a massive red flag. Honest sellers understand that buyers need confidence in their purchase. Once you’ve completed your inspection and addressed any concerns, understanding vehicle history reports becomes your next critical step in making a fully informed buying decision.