
Diy used car inspection: tools and techniques
Conducting your own thorough used car inspection requires minimal investment in tools but delivers maximum protection against purchasing problem vehicles. A basic toolkit including an OBD-II scanner, flashlight, tire tread gauge, and paint thickness meter empowers you to detect issues professionals charge hundreds to identify. Learning systematic inspection techniques—checking for fluid leaks, testing electrical systems, examining tire wear patterns, and measuring body panel gaps—builds confidence in your evaluation skills. This complete pre-owned vehicle checklist approach complements professional inspections while giving you independence during initial vehicle screenings, helping you eliminate unsuitable candidates before investing in expert assessments.
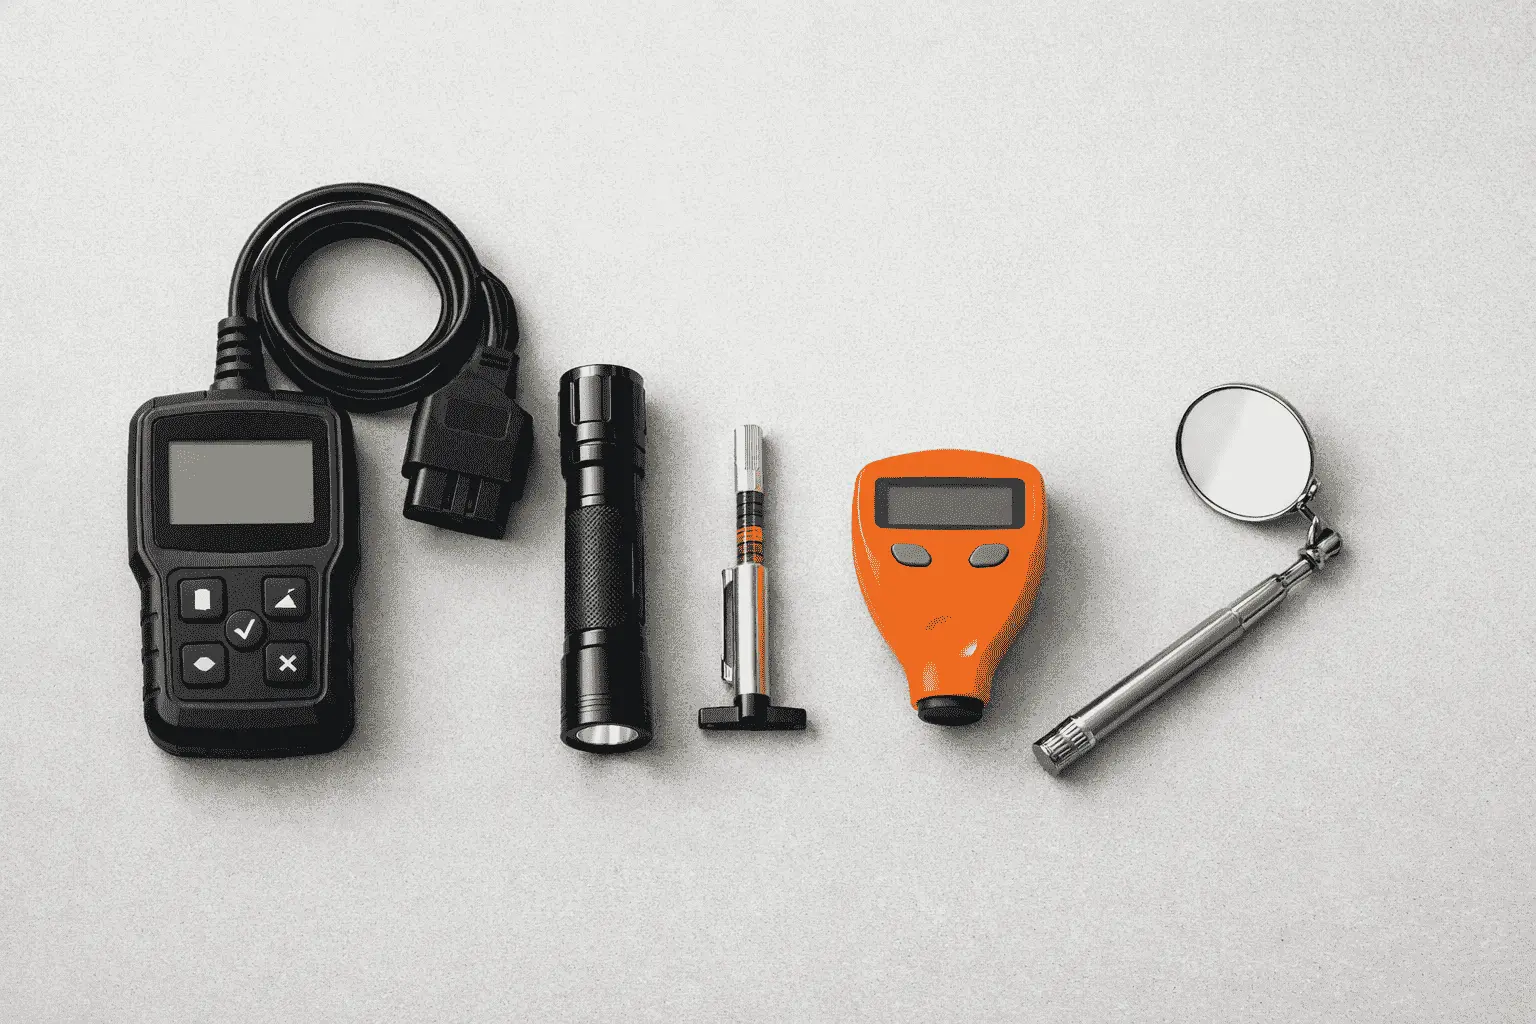
building your diy inspection toolkit
You don’t need a garage full of expensive equipment to perform effective used car inspections. I’ve built a portable inspection kit that fits in a backpack and costs under $200. This kit has saved me from buying problem vehicles at least four times in the past three years.
Start with an OBD-II scanner. These devices plug into the diagnostic port under the dashboard and read trouble codes from the vehicle’s computer. Basic scanners cost $25 to $50 and display engine codes. Better scanners costing $100 to $150 read transmission, ABS, and airbag codes plus display live data like coolant temperature and fuel trim values.
A quality LED flashlight is essential for inspecting dark areas under the hood, beneath the vehicle, and inside the trunk. I carry a bright rechargeable flashlight with a magnetic base that sticks to metal surfaces freeing both hands for inspection work. These cost $20 to $40.
Paint thickness gauges measure paint depth revealing bodywork and repairs. These tools cost $100 to $300 depending on accuracy and features. They instantly identify repainted panels that might hide accident damage. I consider this the single most valuable tool in my kit for spotting undisclosed collision repairs.
A tire tread depth gauge costs $5 to $15 and measures remaining tread. This helps assess tire condition and estimate replacement costs. Tires with less than 4/32 inch tread need replacement soon adding $400 to $1,200 to your ownership costs depending on tire size.
Bring a small mirror on a telescoping handle for inspecting hard-to-see areas like the top of the engine, exhaust components, and frame rails. These cost $10 to $20 at auto parts stores. I’ve found leaks and rust using this mirror that I would have missed otherwise.
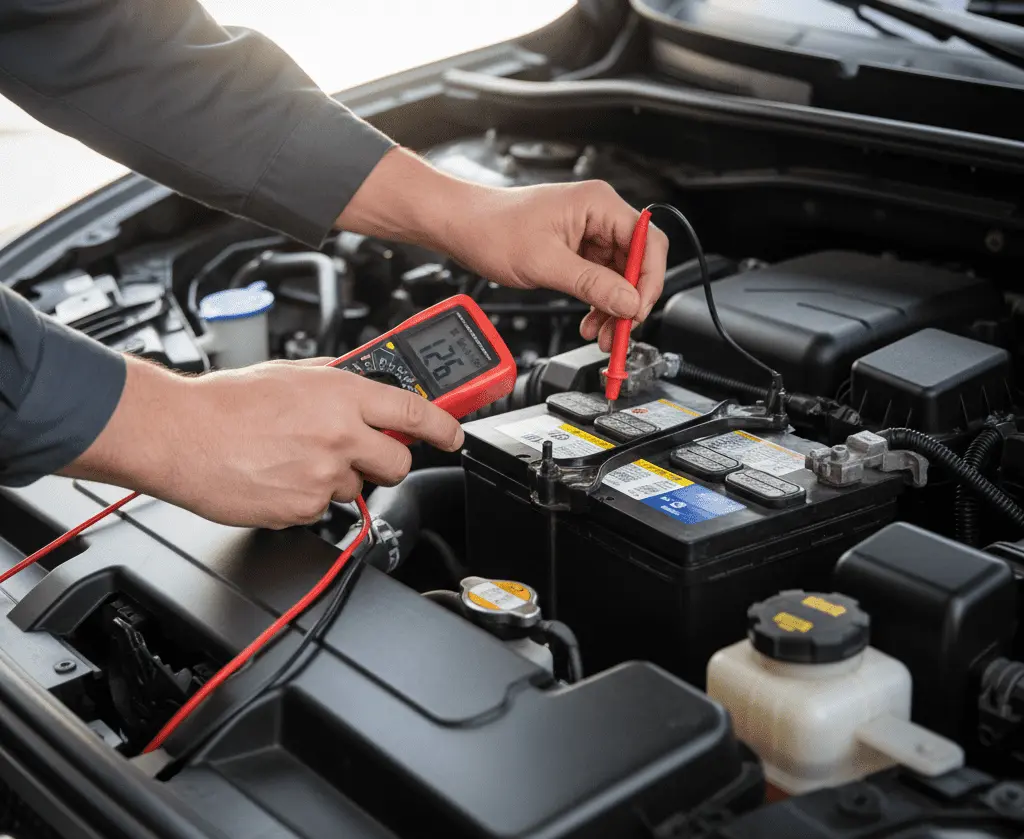
A digital multimeter tests battery voltage, alternator output, and electrical connections. Basic meters cost $15 to $30. Learning to use one takes 15 minutes and provides valuable data about electrical system health.
systematic exterior inspection process
I inspect vehicles in the same order every time following a systematic process that prevents missing important details. This consistency helped me spot a cracked windshield on a black car in dim lighting that I might have overlooked using a random inspection approach.
Walk completely around the vehicle from 10 feet away looking at overall appearance and stance. Does it sit level or does one corner sag suggesting suspension problems? Are panel gaps consistent or do some areas look misaligned? Does paint color match across all panels under natural lighting?
Move closer and inspect each body panel individually. Run your hand along surfaces feeling for ripples or rough spots invisible to the eye. These indicate body filler used to repair damage. Check for overspray on rubber seals, trim pieces, and in door jambs confirming repainting work.
Use the paint thickness gauge on the hood, both front fenders, all four doors, both rear quarter panels, the roof, and trunk lid. Record measurements for each panel. Factory paint measures 3-6 mils. Readings above 8 mils indicate repair work. Consistent high readings across multiple adjacent panels suggest extensive collision damage.
Inspect all glass for chips, cracks, or stars. Windshield replacement costs $200 to $500 depending on the vehicle. Side window replacement runs $150 to $350 per window. Factor these costs into your offer if damage exists.
Check tire condition on all four wheels. Measure tread depth in multiple locations across each tire. Uneven wear patterns indicate alignment problems, worn suspension components, or improper inflation. Look at tire sidewalls for cracks, bulges, or damage. Check the manufacture date code on sidewalls. Tires older than six years should be replaced regardless of tread depth.
Examine wheels for curb rash, bends, or cracks. Cosmetic wheel damage doesn’t affect function but indicates the previous owner hit curbs frequently suggesting possible suspension damage. Bent wheels cause vibration and should be replaced.
under the hood evaluation
Pop the hood and let the engine bay tell its story. A clean engine compartment might indicate careful maintenance or recent detailing to hide problems. An extremely dirty engine suggests neglect. I prefer moderately dirty engines showing honest use without excessive buildup.
Check all fluid levels starting with engine oil. Pull the dipstick, wipe it clean, reinsert it fully, then pull it again to check level. Oil should fall between the minimum and maximum marks. Check oil color and consistency. Fresh oil appears amber or light brown. Black oil indicates it needs changing soon but isn’t necessarily bad. Milky or frothy oil suggests coolant contamination from head gasket failure.
Inspect coolant level in the overflow reservoir. Coolant should be brightly colored green, orange, pink, or yellow depending on type. Rusty brown coolant means the system wasn’t maintained properly. Low coolant suggests leaks. Never open the radiator cap on a warm engine.
Check brake fluid level and color in the master cylinder reservoir. Brake fluid should be clear or light amber. Dark brake fluid indicates moisture contamination and should be replaced. Low brake fluid might mean worn brake pads or system leaks.
Power steering fluid should be at the proper level and appear red or amber. Dark or burnt-smelling power steering fluid suggests overheating from a failing pump or leak. Check for leaks around the power steering reservoir and lines.
Inspect belts for cracks, fraying, or glazing. Press on the serpentine belt between pulleys. It should have slight give but shouldn’t feel loose. Severely cracked or frayed belts need immediate replacement.
Look for fluid leaks around valve covers, oil pan, and rear main seal. Small oil seepage might be acceptable on high-mileage engines but active leaks that drip suggest failing gaskets needing repair.
undercarriage and suspension check
Getting under the vehicle reveals critical information about frame condition, exhaust system, and suspension components. I carry a mechanics creeper and use it whenever possible to thoroughly inspect the undercarriage.
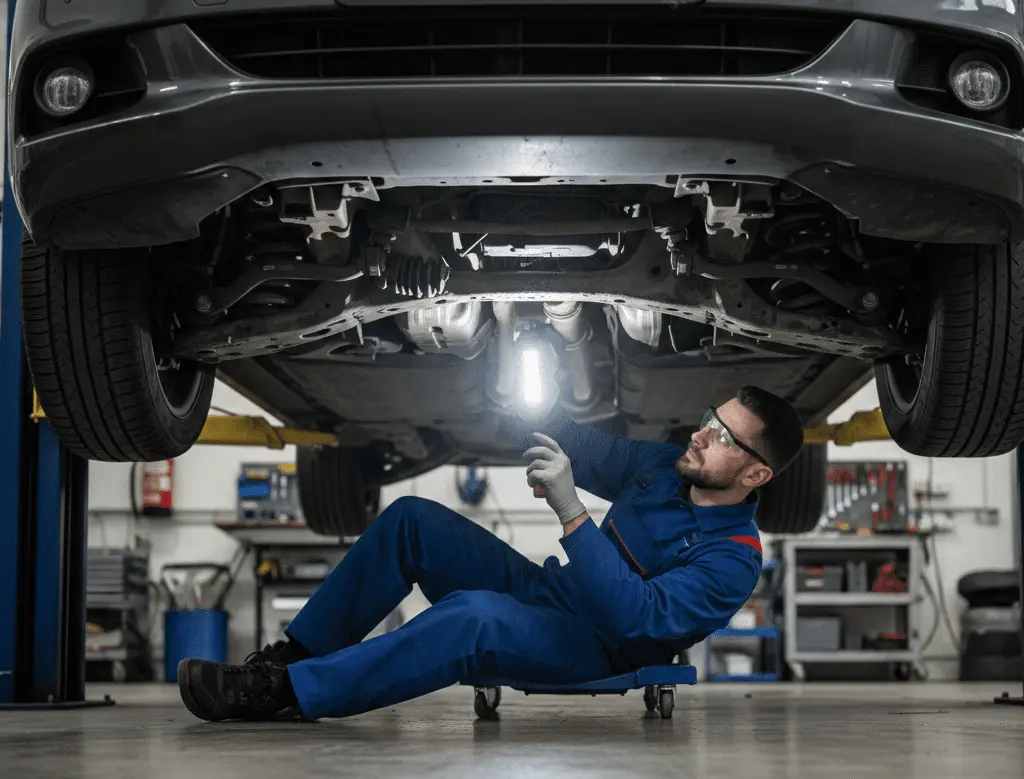
If you can’t get underneath use your flashlight and mirror to inspect what you can see. Look for fluid leaks, rust perforation, exhaust damage, or collision repair evidence on the frame.
Examine the frame or unibody for rust, especially in areas where salt accelerates corrosion. Surface rust is normal on older vehicles but holes or severe scaling indicate structural problems. Northern vehicles show more rust than southern ones.
Check the exhaust system from the manifold to the tailpipe. Look for rust holes, damaged hangers, or fresh welds indicating recent repairs. Listen for hissing or unusual noises when the engine runs suggesting exhaust leaks.
Inspect suspension components including control arms, ball joints, tie rod ends, and sway bar links. Look for torn rubber boots, excessive corrosion, or loose connections. Bounce each corner of the vehicle and watch for excessive movement or unusual noises.
Check CV axle boots on front-wheel drive and all-wheel drive vehicles. Torn boots leak grease and allow dirt into the CV joints causing expensive failures. Replacing CV axles costs $300 to $600 per axle.
interior inspection techniques
The interior reveals how previous owners treated the vehicle. Excessive wear suggests hard use while pristine interiors might indicate low mileage or recent detailing.
Sit in the driver seat and adjust it through its full range of motion. The seat should move smoothly without binding. Test the recline mechanism and lumbar support if equipped. Check for rips, stains, or excessive wear on upholstery.
Test every electrical component systematically. Windows should operate smoothly without hesitation. Door locks should click decisively. Test the radio, climate control, cruise control, and any other features the vehicle offers.
Check all gauges when you start the engine. The check engine light should illuminate briefly then extinguish. Warning lights that stay on indicate problems requiring diagnosis. Use your OBD-II scanner to read any stored trouble codes even if warning lights aren’t currently illuminated.
Smell the interior carefully. Musty or moldy odors suggest water leaks or flood damage. Excessive air freshener might mask these smells. Check carpets for dampness especially under floor mats and in the trunk.
Inspect headliner condition looking for sagging or water staining. A sagging headliner costs $200 to $500 to repair and indicates either age-related adhesive failure or water damage.
test drive evaluation
The test drive reveals problems static inspection can’t detect. I follow a specific route testing various driving conditions including highway speed, city traffic, and rough pavement.Start the engine when cold if possible. Listen for unusual noises during startup including ticking, knocking, or grinding. The engine should idle smoothly without surging or rough running.Test the brakes immediately in a safe location. The pedal should feel firm not spongy. Braking should be smooth and straight without pulling to either side. Listen for grinding or squealing suggesting worn pads or rotors.Accelerate moderately and feel for smooth power delivery. The transmission should shift seamlessly in an automatic or engage cleanly in a manual. Any hesitation, slipping, or harsh shifting indicates transmission problems.
Drive on rough pavement listening for suspension noises like clunks or rattles. These sounds indicate worn components needing replacement. Test the steering noting any play, vibration, or unusual feedback.
Get the vehicle up to highway speed checking for vibrations, wind noise, or pulling. Highway driving often reveals issues not apparent at lower speeds like wheel balance problems or alignment issues.
Return to where you started and immediately check under the vehicle for new fluid leaks. Some leaks only appear when the engine reaches operating temperature and builds pressure in various systems.
putting It all together
DIY inspection skills develop with practice. Your first few inspections will feel awkward and time-consuming but the process becomes natural after inspecting several vehicles. I can now complete thorough inspections in 30 to 45 minutes.
Document findings with photos and notes. This record helps during negotiations and provides evidence if undisclosed problems appear after purchase. I’ve successfully negotiated $500 to $1,500 price reductions by documenting issues sellers didn’t mention.
Know your limits. DIY inspection catches obvious problems and red flags but it doesn’t replace professional pre-purchase inspection for vehicles you’re seriously considering. I use DIY methods to screen vehicles quickly then pay for professional inspection on my top choice.
The confidence gained from understanding inspection techniques transforms the used car buying process. You approach vehicles armed with knowledge and tools rather than relying entirely on seller honesty. This independence helps you make informed decisions protecting both your safety and investment.
Combining your newfound DIY skills with understanding what professional mechanics check during pre-purchase inspections creates a comprehensive approach to used car evaluation that minimizes risk and maximizes value.